Capture One Pro - Save Filters for Searching Metadata
Capture One Pro,  Capture One Pro,  News,  Tutorials

Hidden Features of Capture One Pro: Save Filters for Searching Metadata

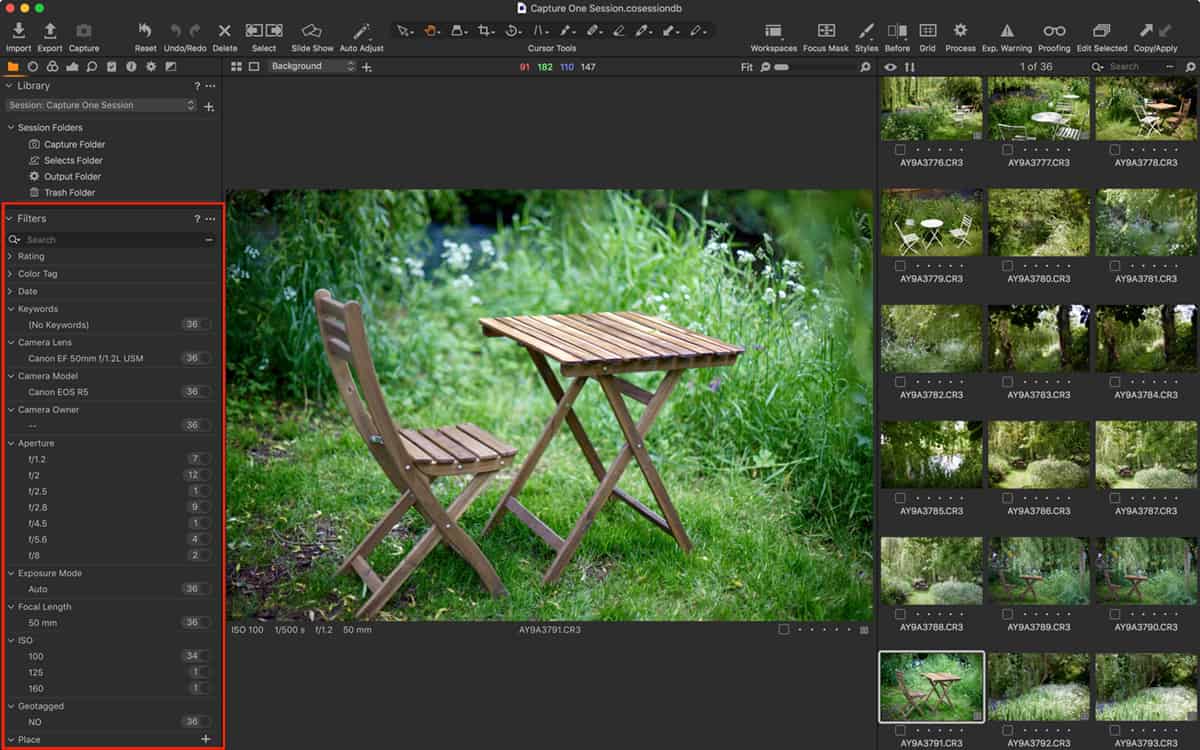
Filters are an often over-looked feature in Capture One and they’re really very powerful for searching for images. You might already use them to find starred or colour tagged images but they can be set-up to search for any metadata that’s listed in the Metadata tool. As a camera and lens reviewer (formerly for numerous press titles in the UK), I often want to find photographs taken on certain cameras or lenses and so I have theses filters saved for just that purpose. I can also search by ISO, aperture value and even shutter speed if want to (the latter not so much, if I’m being honest).

While those particular filters might not be of interest to you specifically, there are others, including keywords, which allows you to search a Session or a Catalog’s worth of images by keyword used. If you’re a stock photographer, this is incredibly useful (and although a little disjointed from the Keywords tool, it’s what you should be using to find images with keywords to begin with and then select the specific keywords you’re looking for).

There are other filters and this isn’t meant as a definitive guide; more a pointer to go find out more.

Here’s how to access and set up which filters you want active.

  1. First, open a Capture One Session or Catalog. It doesn’t really matter which as the Filter options are saved as a separate component of the desktop UI. However, if you want to use it immediately then you might as well open a (Session or Catalog) document you want to search through.
  2. Next, go to the Library tool tab and the Filters tool. Expand it fully to help you navigate the active filters. If you’ve not used it before there will be just three (default) active filters in use; Rating, Colour Tag and Date.
  3. Click on the ellipsis (…) icon top right in the Filter brick’s toolbar and select Show/Hide Filters… A new (Show/Hide Metadata Filters) window opens.
  4. Click in the window’s bar at the top and drag it away from the tool tab so it can be more easily seen. Save Filters for Searching Metadata
  5. Now, select what attribute you want to search for, and click in the relevant box adding a check mark. That’s all there is to it. From now on, no matter what document you open these filters will be active. (To deactivate a specific filter, simply remove the check mark).
  6. To filter using two or more criteria (and this really is a hidden feature), hold down the Option (Mac) key while making your selection.
  7. If you want to clear some space, click on the window’s cross-shaped icon to close it and the Filter tool remains ready to use.
  8. When the time comes to search a Catalog or Session, simply go to the Library tool tab, navigate to the Filters brick and click on the specific filter to select the images with that attribute.

Support this site

If you found this feature useful, please consider buying a license or subscription through our links. Please enter the promo code ‘DJP’ at checkout – you won’t earn any discount (or any additional discount, if any is offered) but it will be seen as a show of support for this site to Capture One A/S. Sales through these affiliate links may earn commission, which helps the running of this site.